|
What
follows now is the sequence for first creating the "burr"
or "wire edge" on the tool and then in succeeding steps,
removing it by abrasion and and fatiguing the metal by alternately
rubbing the bevel, then the back, onto the stone. The steps (shown
on the previous page) for holding and moving the tool on the stone
are always the same regardless of where in the honing procedure
we are.
Hint:
at first, try stopping at the end of each stoke to check the solidity
of the down holding pressure on the bevel. The bevel should "click"
against the stone. As your hold-down technique becomes consistently
good progress to continuous back and forth strokes.
|
 |
 |
| Feeling
for a burr. Always feel by moving your finger
from the back of the chisel off the edge, not onto the edge. |
 |
| The
burr or wire edge on the back |
|
1.
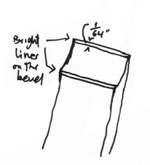
If tool is fresh from the grinding wheel, rub until a bright line
appears on the bevel all along the cutting edge and the heel (=
20-30 strokes). (Note: Do not rub back of tool yet.) The
bright lines are flats abraded by the stone; they needn't be wide.
A scant 1/64" is enough.
2.
If tool already has the bright lines (i.e., was previously honed
on an oilstone) then rub till a slight roughness (a "burr"
or "wire edge") can be felt on the blade's back, just
behind the cutting edge. This burr should be palpable all along
the cutting edge. Keep checking your progress. When examined under
a bright light no light should reflect on
the edge itself (on the edge viewed from the end, not the flats
on the bevel). Any reflected light indicates dullness. Sharp edges
reflect no light!
|
