|
|
Table of contents |
A Guide to Honing and Sharpening
Holding
the Blade on the Stone
Click
on the picture to enlarge
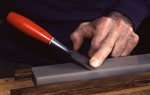
| For the purposes of this lesson we will use a chisel. The exact same motions apply when sharpening anything. Thinner tools, such as plane blades, are harder to hold firmly without rocking; this is because the bevel has less area upon which to seat solidly on the stone. However, once you have mastered the technique of holding a chisel firmly, without rocking, holding a plane blade correctly will occur with only a little more practice. | ||||
|
The key to maintaining a consistant bevel is to hold the tool so that the bevel is in contact and remains in contact with the stone. Note: In the following examples using oilstones the stones have all been doused with a liberal amount of oil. |
||||
 |
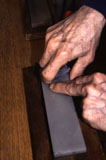
It is possible to hold the bevel flat against the honing stone with a single finger. While this is tiring and impractical, it does serve as the basis for a grip on the blade that will concentrate force at the bevel. | |||
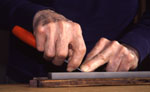 |
Using one or two fingers of the left hand (more fingers for wider blades), press down on the back of the blade at the very tip. The bevel must touch the stone firmly (oil will squish out). With the right hand add gentle support but allow the left hand's downward pressure to dominate totally. |
|||
 |
Here you see the middle finger of the left hand pressing down at the front of the blade and the thumb and forefinger of the right hand grasping the sides of the blade as close to the stone as possible. | |||
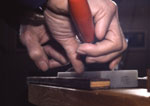 |
From the back you can see how the fingers of the right hand curl lightly under the blade to take some of the weight of the blade. | |||
|
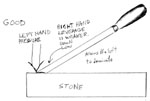
Left
and Right Hand Pressure
|
||||
|
Preventing the blade from rocking during the back-and-forth of honing is perhaps the single most important part of the sharpening process. What we did with our hands (above) can best be summarized as follows:
|
||||
|
A
little extra detail about this may be helpful.
|
||||
| The left hand pressure should come from straight, rigid fingers, never bent backwards (inefficient and painful). These fingers can even be curved down (not illustrated) like claws, with as many fingers, side by side, as the blade width allows. The fingers should be all the way forward, nearer the tip than the heel of the bevel. Don't worry about the fingers riding very close to the cutting edge: They are on top, not in the path of the edge motion. Press down hard until it almost hurts. | ||||
| The right hand hold of "loose and low " is of critical importance. To start, gently straddle the blade from left to right (not from top to bottom), thumb on the left edge, index finger at the right edge. Curl the remaining three fingers lightly under the blade (as in the pictures). The right hand should be low enough to touch the left hand. | ||||
|
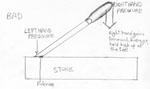
The reason for the right hand's being loose and low: 1: The clear downward "click" of bevel to stone gets blurred by a rigid right hand grip. You can't hear and your can't feel the click of contact, though too much right hand tension. Experiment with a loose then a tight right handgrip. Notice the loss of a clear clicking. Sensations as a tightened right hand mutes the impact, so it feels blurry, as through the bevel were round. A question to ask: Is the right hand purely passive, or does it help out? Well, it helps but subtly. It relieves the some of the left hand's strain by supplying just enough weak upward pressure to help glom the bevel home. In this dance the left hand leads, the right follows. 2: The reason for keeping the right hand cradled low on the blade is that the right hand, held high up, gains undesirable, superior leverage. Any slight twitch of the right hand easily overwhelms the left's solid contact; The bevel's heel is only a tiny fulcrum, which is acted on by increasing the lever's length (when then right hand is raised high. |
||||
|
||||
![]()
![]()