 |
 |
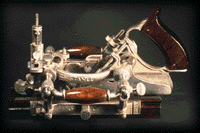
Adjusting and Using the Stanley 55
|
|
|
Properly set up the 55 is incredibly easy to use. A major part of the learning process
involves getting used to how the plane feels when it is cutting properly, so you can
recognize when something is out of whack. Ideally of course the best thing is to have
someone with experience setup the plane for you and show you what it can do. Failing that,
you will just have to take our word for it that, properly set up, and planing with the
grain, the plane will work perfectly. The cutting action is smooth, with fine shavings,
producing a finished moulding that doesn't require any sanding. Following the
instruction manual is no guarantee of success so here is the process broken down step by
step:
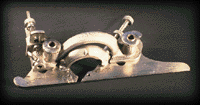
1 - Set the cutter in the main body skate, making sure that the cutter is snug
against the inside channel under the blade holder. Adjust the height of the blade so that
it barely clears the skate, then tighten the wingnut that holds the blade. All other
adjustments are taken relative to the blade from here on, so if you re-adjust this depth
you will have to reset everything else. |
 |
|
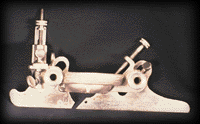
2 - Adjust the outside skate to the outside of the blade, the same way as was
done for the 45. The width between the outside and inside skates must be fractionally less
than the width of the blade, or the plane will bind as the moulding sinks into the wood.
It is a good idea to check the distance between the skates , front and back to make sure
the skates are parallel to each other. With the width set set the vertical adjustment so
that the outside skate will regulate the exposed cutting edge of the blade. To do this,
loosen the knurled bushings around the 55's arms, and raise or lower the outside skate by
turning the double-threaded screw adjustment. This skate will raise and lower at an angle
so that the outside skate will always support the outside edge of the cutter. It is
critical to sight down the skate and set the skate to take as fine a cut as possible. To
prevent backlash always lower the skate past the correct depth and then raise it to the
correct cutting position. Once the skate is correctly set lock the bushings on the rods. |
 |
|
3 - Next, set the center skate. Move it horizontally to a point on the cutter
where it can support the regulating action of the other skates, then adjust it vertically
for a fine cut. Tighten everything down on the plane, and check the skates again to make
sure that the skates will allow the blade to cut while at the same time minimizing the
depth of that cut. |
|
|
4 - Adjust the fences and depth stops. When starting out I would suggest
working on the edge of the board with both fences clamping it. This will make it harder to
plane as there is more friction with two fences, but it will be more likely to get you a
good result. There are lots of things that can and will go wrong.
The force of planing a complex moulding (and many of the simple mouldings) often wants to
force the cutter away from the wood. This means that if you plane the face of a board
along the edge with one fence, the greatest difficulty you will have will be in trying to
keep the fence tight against the corner. In fact, in this situation I find that I use more
force with my left hand to control the plane than I use with my right to make the
moulding. Traditional wooden moulding planes are "sprung"
so that you hold the plane at an indicated angle and most of the planing force is down.
For complicated mouldings you can spring the 55 by rotating the fences but it will change
the geometry of the profile. Another solution is to start 1/8th inch in from the edge and
use the excess to help guide the plane, after you finish trim the excess off.
If everything seems to be going fine but the plane starts taking heavier and heavier
cuts until it is really chewing up the moulding you have a backlash problem. It seems as
if the cutter is working its way down and exposing more blade. What is really happening is
that the outside skate is being pushed back due to the bit of slack between the double
threads and the mounting for the skate. The solution involves the setting up of the plane.
Always lower the outside skate past the blade and then back it into position, and remember
to tighten the knurled bushings. |
 |
|
It is important to hold the plane steady against the guides as it cuts. Allowing the
plane to wobble will loosen the fence faces (if you are using both at the same time) or
result in a moulding with slightly different heights along its length. This will be very
noticeable if you are making any sort of moulded frames. The best way of holding the plane
is with one hand pushing (with the index finger extended to hold your control) and the
other hand pressing against the fence, which will help keep the fence against the wood and
also keep the plane steady. Another problem that may be encountered is that the plane
stops cutting at a certain depth along the moulding, or that you find it will only cut if
you wobble it as you cut. In both cases, this is because one of the skates is improperly
set and is acting as a depth stop instead of allowing the blade to cut. Wobbling allows
the other part of the cutter to cut more, and you get an uneven moulding. Make the
necessary adjustments to allow the blade to work, remembering to reset anything else
affected by this adjustment.
I think that each plane has its own peculiarities. Ours has one thumbscrew that always
seems to work loose. You'll find that most of these problems disappear as your planing
technique improves, and that you can change blades and reset them in a matter of three or
four minutes once you know what to look for. |
 |
|
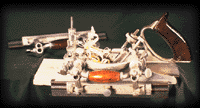
One last comment. There are really no shortcuts with the 55. You may be tempted to
"hog out" lengths of wood with your tablesaw or plow plane, reducing the amount
of wood to be planed and establishing depths to work the plane towards. This works well
with wooden planes, because they have their blades supported by complete soles and can
start cutting anywhere along the moulding profile. This doesn't work with the 55. It can
only start cutting where the blade is regulated by a skate, and it will take longer
(assuming it can even be done and you get it right) to set this up than it would to just
go ahead and plane down all the wood. |
 |
|
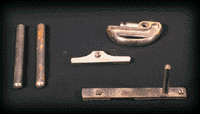
The short rods(left), Depth Gauge (bottom), and Cam rest (top) accessories of a
Stanley 55 |
 |
|
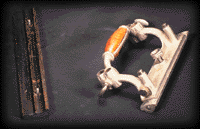
The adjustable fence with a fine adjustment for the Stanley 55, shown here with the
rosewood section detached. The inside surface is rounded to allow the fence to work at
angles from 90 to 45 degrees. Sawdust often gets packed in this joint during use and
should be cleaned out.  
Copyright 1999 01 Inc., NYC |

